
In January 2017, Google Chrome 56 started showing a warning for unencrypted sites that collect passwords or credit card information, labelling them as “not secure”. And from July 2018, Chrome 68 will soon flag every HTTP site as ‘not secure’.
“A web with ubiquitous HTTPS is not the distant future. It’s happening now, with secure browsing becoming standard for users of Chrome,” say Chrome’s security team.
While people ignore security alerts 87% of the time, it’s unlikely they’ll be able to ignore an alert like this one:

That’s how Google Chrome is planning to label HTTP pages.
Why is Google doing this? Because despite the many benefits of switching to HTTPS, many site owners haven’t done so.
For a while now, Google and other search engines have been on a mission to make the web more secure. Google has already taken action in this direction by announcing HTTPS as a ranking signal and indexing secure pages over unsecured pages. They’ve even published a guide on securing your website with HTTPS, which we encourage everyone to read.
Yet with all this push towards a more secure web, stats don’t lie – less than 0.1% of websites are secure.
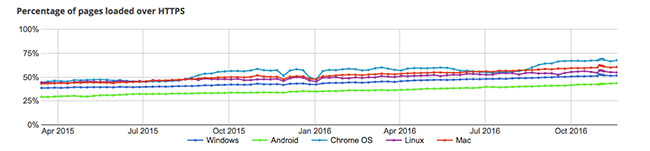
On the other hand, HTTPS dominates Chrome browsing. Figures from Google’s Transparency Report show that worldwide the percentage of pages loaded over HTTPS on Chrome on all platforms has surpassed 50%, up from 40% in mid-2015. On Chrome OS the figure is 68%.
So there’s more work to be done, which explains Chrome’s action to get non-secure sites to migrate to HTTPS.
If you’re feeling intimidated by the prospect of switching to HTTPS, in this post we’ll share as much information and advice to ensure everything goes smoothly.
SSL Migration PDF Checklist
We have a PDF you can download and refer to every time you need to move a site from HTTP to HTTPS. A complete checklist that ensures you don’t miss a thing on your way to a more secure site.
Why should you consider HTTPS?
If you’re working with sensitive customer information, whether that’s credit card info or login credentials, HTTPS is a good way to reassure people that your site is secure. But apart from being more secure, which is becoming vital when trying to build trust and credibility online, there are some additional reasons why you should consider moving to HTTPS.
HTTPS is a lightweight ranking signal
This means it can help your SEO game, giving your site a small boost in the search results. Read HTTPS as a ranking signal by Zineb Ait Bahajji and Gary Illyes, Webmaster Trend Analysts.
HTTPS pages can load much faster than HTTP
Because HTTPS allows the adoption of HTTP/2, HTTPS can be faster than HTTP .Check out the HTTP vs HTTPS Test, that loads 360 non-cached images on both HTTP and HTTPS connections. So if page speed is a concern, you have one more reason to adopt the new protocol.
You get access to better referral data
HTTPS to HTTP referral data is blocked in Google Analytics. What’s more, referral traffic coming from HTTPS to HTTP is reported as Direct traffic. But with more sites migrating to HTTPS, you won’t have to worry about losing or not being able to access referral traffic.
Key things to consider when migrating from HTTP to HTTPSThere’s one key thing you should be aware of: Google treats HTTPS migrations as a site move and, as you probably know, a site move can come with some rankings issues. This means that:
- You may experience a temporary fluctuation in site ranking during the move.
- HTTPS sites receive a small ranking boost, but don’t expect a visible change.
Decide on the right SSL for your site
Find the SSL that best suits your website. At Heart Internet, we offer three types of SSL Certificates:
- Simple SSL – ideal for small sites and businesses just getting off the ground that are looking for the essential security and encryption to protect their customers’ data
- Standard SSL – perfect for online traders and growing businesses who need a secure solution to accept online payments from customers
- Extended SSL – great for large websites and established businesses who need maximum protection for their sites and their customer’s data
Whichever certificate you choose, make sure to consider Google’s recommendations when selecting an SSL:
- Use robust security certificates
- Ensure a high level of security by choosing a 2048-bit key, or upgrade if you already have a certificate with a weaker key
- Double check to make sure you’ve registered your certificate to the correct host name.
- Old OpenSSL versions are vulnerable, which means you’ll need to ensure you have the latest and newest versions of TLS libraries.
Gather current website URLs
Put together a list with all your current website URLs, both from your main site and any other existing subdomains. This will come in handy for when you need to check to ensure all URLs redirect correctly to HTTPS after the move.
Use a crawler to get all your URLs. We’d also suggest exporting all your URLs from Google Analytics just in case you have pages that the crawler isn’t able to find.
Before you start the process of moving to HTTPS, we recommend you do all updates on a dev area. This allows you to double-check everything before going live with HTTPS. At the same time, you’ll be able to minimise and perhaps even eliminate the impact of the HTTPS migration.
Install your SSL on the server and verify that your installation is correct
First, you’ll need to check and see if your web server supports HTTP Strict Transport Security (HSTS) and make sure that’s enabled. HSTS tells the browser to request pages using HTTPS automatically, even if a user enters HTTP into the browser. This also tells Google to serve secure URLs in the search results. Using HSTS is important because it minimises the risk of serving unsecured content to your users.
When you’ve decided on the SSL certificate and provider you’re going to use, next you’ll need to use OpenSSL to generate a certificate signing request (CSR) and private key. OpenSSL is usually installed under /usr/local/ssl/bin. If you have a custom install, you will need to adjust these instructions appropriately.
Run the following command at the prompt:
openssl req -newkey rsa:2048 -nodes -keyout www.mydomain.com.key -out www.mydomain.com.csr
You will now be asked for your information, which will be included in your certificate request. It’s critical that the Common Name field matches the name that you want to use your certificate with. Also make sure that all of the other fields accurately reflect your business details.
This will generate a .key and .csr file. The .key file is your private key so make sure you keep it safe. You’ll need to send the .csr file to your SSL Certificate provider when you request your SSL certificate.
You will need to copy and paste your CSR when submitting your certificate request to your certificate provider.
Now you are ready to buy and install your SSL certificate:
If you’re on our shared cloud hosting platform:
- Purchase the SSL for the website of your choice.
- Check your [email protected] email for the link.
- Click the link, and your SSL certificate is automatically installed on your hosting package.
If you have a VPS, Hybrid Server or Dedicated Server:
- Purchase the SSL for the website of your choice.
- The SSL email is usually sent to [email protected].
- Click the link, and your SSL will be passed to our support team who will check if you want to install it yourself or want them to do it.
- Your SSL certificate is then installed
If you want to check and make sure you’ve installed everything properly, you can try these tools:
Consider improving speed
You can further optimise your website’s speed by adopting HTTP/2 which only works with HTTPS.
HTTP/2 is the latest update to the Hypertext Transfer Protocol and it’s based on Google’s SPDY protocol, which was developed to improve the speed and performance of browsing on the web. It works by making one connection to the server, then “multiplexes” multiple requests over that connection to receive multiple responses at the same time. This way the data is interwoven more efficiently on that single connection.
Read our post to learn more about HTTP/2 and how you can make the switch.
Change your URLs to HTTPS
Based on the CMS you’re using, there are different options:
- You can use protocol relative URLs
- Search and replace in the database
- Use an SSL plug-in
Make sure all canonical and hreflang URLs also point to the new HTTPS location.
Find all subdomains that use your main domain as well, and ensure they’re served through HTTPS too. You can’t link to the subdomains if they’re left on HTTP as you will still have unsecure URLs on your website.
It’s better to replace http with https URLs even if you do a server-side redirect. You don’t want to load all those redirects in your pages as that will slow down your pages’ loading time.
Have a look at any plug-ins or modules that might need updated HTTPS URLs as well based on your website’s configuration.
Update internal resources to HTTPS
All your images, scripts and CSS files should also be retrieved from HTTPS locations. Ideally even external scripts and resources should be pulled from secure URLs.
You can use a tool like SSL Check to check and ensure you haven’t missed anything. However, the most reliable approach would be a full crawl of your website. We recommend combining crawlers such as Screaming Frog and Xenu so you don’t miss anything.
Create 301 redirects from HTTP to HTTPS URLs
To make sure you haven’t missed a thing, it’s better to do 301 redirects from your server’s htaccess or config file. You don’t have to create a redirect for each URL but rather use a rule that forces HTTPS. This guide from Geekflare explains how to do HTTP to HTTPS redirects on various platforms.
You should also minimise redirect chains. For example, if an old page (A) redirected to a new page (B) and the new page now redirects to https (C), you can get this redirect chain A-B-C. You can update the old page (A) to redirect to https directly (C), skipping the new http middle redirect. This way you get these redirect pairs A-C and B-C.
Update sitemaps and robots.txt files to reflect the new URL structure on HTTPS.
This one should be fairly obvious, but can be overlooked. When doing your 301 redirects, make sure that anything in your robots.txt that has an http is switched to https.
Verify the new HTTPS property with Google Search Console
We also recommend doing a fetch and crawling all URLs to help Google discover your URLs faster. Now, if you’ve previously submitted a disavow file for your HTTP website, make sure to submit a copy of it in your HTTPS profile as well.
Update your Google Analytics profile with the new HTTPS URL
If you have Google Analytics, you’ll need to make sure that you’ve put in https as your default URL.

Update social and PPC URLs to the new HTTPS
Make sure you replace PPC landing pages with the HTTPs version URLs so it doesn’t affect the landing page score.
To migrate social shares to the new URLs you’ll need to:
- Get the HTTP version of the current page/post URL.
- Pass the URL to your plugin to tell it the URL it should use rather than the one the plugin auto-generates.
This post from Search Engine Watch explains how you can maintain social shares after a site migration, and which tools to use.
Update incoming links
Ideally you should contact websites linking to you to let them know your URL is now HTTPs. This can also save them from loading a redirect on their pages and point to your new URLs. If this doesn’t work, you should at least update the incoming links you do have access to.
Update your CDN URLs if you’re using one
If you’re using a content delivery network to speed up your page loading time, such as BootstrapCDN or CloudFlare, make sure that the files you pull in are also from https connections rather than http.
Monitor everything
After going live with HTTPS, monitor everything to ensure all traffic levels are unaffected (GA), your CTR is in limits (GSC), your social accounts still work as expected and users can still like, tweet and share.
Common problems you might have
Here are the most common mistakes that happen during a HTTPS migration:
- Blocking Google from crawling your HTTPS URLs – make sure you’re not blocking this from robots.txt or a page-level noindex tag forgotten from your testing area.
- Creating duplicate content due to lack of HTTP to HTTPS permanent redirects.
- Not replacing all on-page HTTP URLs with their HTTPS counterpart.
If you avoid making these mistakes and follow the recommendations in this post, your migration should be smooth with no noticeable impact on traffic or ranks. However, if you think you’ve done everything correctly but still notice issues, Moz has a great article on recovering your organic search traffic and tracking down mistakes done during a search migration.
So, are you ready to move to HTTPS?
Will Heart be introducing AutoSSL / LetsEncrypt.org capabilities for standard hosting accounts?
I was thinking that myself 🙂 – would be great feature – I use siteground as well as Heart and it is a free option
Well explained, Roxana.
Thanks for a good length article about the move to https:// – very useful with all the steps to think about. I have yet to do it on my site (probably like many others) but something for the start of the year during the slower period when all the mistakes etc hopefully won’t have such dire results.
Perhaps Heart should now be including the https:// by default and in the price for new domains and encourage that approach in general.
It is a pity that https:// was not the default from the start and then the websites would not have to go through the change to a more secure environment. As I don’t use Chrome, probably wouldn’t have noticed the change for a little while but I have seen more and more about it.
I guess a lot of websites that are purely information and are not collecting data (no forms etc or anything (such as mine) don’t see the need for the purchase of an additional SSL etc… perhaps the reason for the slow pickup for many.
My other shared host has a checkbox in their control panel that turns on free Lets Encrypt SSL for my domain. It would be great if Heart could catch up with them.
We moved https://www.indexnuke.com over to SSL about a year ago. It took a good month or so to see any movement. Worth the hassle though.
I’m a re-seller with Heart, and have close to 100 websites. Heart will need to make an easy and cost effective way for me to add SSL to all my sites. At the moment, as a re-seller, the cheapest certificate I can get is £50.
I agree – it would be great to have the option to use LetsEncrypt.org. If we’re in a situation where Google is effectively black-listing sites for not having SSL, surely it’s up to the hosting companies to step up and make this a standard addition to all hosting packages.
Great migration process, shame this page has insecure / mixed content on it currently but i’m sure you’re working on this. If it helps, HTTPS Checker (https://httpschecker.net/) can help you find these issues to fix.
We have been trying to get an ssl certificate for a very long time now, maybe a year or so. I am with a reseller through Heart Internet, but communication is an issue for some reason. I did manage 6 websites, but I now only manage 2 with the reseller because of the issues. SSL should be standard on any website as security of public data is important. Let’s Encrypt is easy to install. We have used it on other hosting packages. Unfortunately, big hosts are still looking to make money by selling ssl certificates instead. Hopefully this will chage in the future.
It’s a great article. However a couple of technical things I spotted:
– “HTTPS pages load much faster than HTTP” is incorrect. How can this even be possible? SSL requires additional handshake round trips per connection to exchange keys. It also increases server CPU cycles to encrypt/decrypt data, and the client (browser) needs to do the same, which will inevitably make things slower. The only way this -might- be remotely true is if you used HTTP/2 as there’s only one streaming connection so one handshake (but the encrypt/decrypt work still has to be done), which is an excellent segway to…
– “You can further optimise your website’s speed by adopting HTTP/2 which only works with HTTPS.” While this is true, HTTP/2 adoption so far is slow and with good reason. For most of us, HTTP/2 is simply out of reach because Google Chrome requires APLN from the server to work. IIRC, this is only available out of the box on Ubuntu 16.04. Of course it’s possible to get it on other OS versions and platforms, but it involves upgrading OpenSSL to at least version 1.0.2 – which is not fun I can assure you
I’m working with AWS at the moment to get them to upgrade OpenSSL on their main ElasticBeanstalk AMIs. The article you linked to doesn’t highlight this problem either which makes it look like a simple task… which is misleading. Because while you can get HTTP/2 to work on just about any other browser without messing with OpenSSL and while maintaining most hairs on your head, Chrome says no.
If you have the Plesk 12.5 control panel, then Let’s Encrypt is available when you click on a domain name. Certificates are free to install, and they renew automatically.
Will it show this for the whole site or JUST the login pages? My site uses varnish caching, which i’ve heard SSL has problems with/slows down cached pages. My checkout/login/cart/registration pages are all SSL secured however product pages and CMS pages are not, for speed. Is this sufficient?
Very good, enjoyed reading.
Funny thing is, as of 25th Jan 2017, this page is trying to load scripts from unauthenticated sources 🙂
Well explained and bookmarked for my inevitable HTTPS transition. However, one of the big sticking points with HTTPS is advertising revenue.
I shifted my site thecarexpert.co.uk to HTTPS last year, and ad revenues plummeted by about 85%. Eventually discovered that Google AdSense has (or at least had at the time) very few advertisers who worked with HTTPS. Media.net and other providers either simply did not support it or paid pathetic revenues.
After a month, I had to shift everything back to HTTP as the whole exercise had cost a fortune in time spent and lost revenue. I won’t be revisiting HTTPS unless forced to or ad revenues increase. The most frustrating thing was that the issue of HTTPS was being pushed by Google, yet their own ad programs are not HTTPS-friendly.
Looking forward to Let’s Encrypt coming into the Heart control panel, particularly after Google’s latest announcement!
We’ll need to make all of our client sites HTTPS. Our WP Engine clients are ahead of the game so hopefully his can be sorted for customers very soon!
It’s a shame Heart have been so slow to embrace Let’s Encrypt as it makes this whole process much easier and cost effective.
Hi Pete,
Our Managed VPS platform includes Let’s Encrypt as standard. We are looking into integrating it into our shared hosting platform, but it is an ongoing process.
Looking forward to Let’s Encrypt coming into the Heart control panel, particularly after Google’s latest announcement!
We’ll need to make all of our client sites HTTPS. Our WP Engine clients are ahead of the game so hopefully his can be sorted for customers very soon!