If you’ve been working with WordPress for any time, there’s a good chance you’ve found the need to create more than one WordPress site. After all, the software is free, easy to install, and can be used for all kinds of websites.
But if you do want to run more than one WordPress website, there is an easier way, and that’s WordPress Multisite.
In this post, I’m going to explain exactly what WordPress Multisite is, work through some of its benefits, and show you how to activate and manage a Multisite network from your existing WordPress installation.
What is WordPress Multisite?
WordPress Multisite is a configuration for WordPress that lets you run more than one website on one installation of WordPress. In short, it creates a network of sites on your WordPress installation.
Once you’ve got it set up, you can add as many sites as you like, and they can be as similar or different as you want them to be.
If you’ve ever used wordpress.com, you’ll have seen Multisite in action. WordPress.com is one vast Multisite network with millions of users. Your network needn’t be that large!
WordPress Multisite has plenty of benefits:
- You only need one username and password to access all of your sites.
- Other users can create accounts and sites on your network and manage them — something you could charge for.
- You only need to install themes and plugins once on the network, then you activate them for the sites where you want to use them. This saves you time on updates and on server space too.
- The fact that you’re running one WordPress installation instead of lots of them will also save on server space and could save you money.
When you activate WordPress Multisite, you’re provided with some extra screens for managing the network — the network admin screens. You use these screens to create new sites, install and update plugins and themes, manage users on the network and manage the sites.
WordPress Multisite can be used for a variety of purposes:
- If you host client sites, having them all in one network can save you time on running updates, and money on server space.
- If you run multiple sites for yourself or your business, keeping them all in one place will make them more efficient.
- You can create a network of sites that people can pay to be a part of, providing you with business opportunities. Alternatively, creating a site could be free but you could charge for premium options, like wordpress.com. You could create a network for your sector or customer base.
- If your company has multiple divisions or trades in multiple countries, you could create a site on your network for each of these.
In all of these cases, WordPress Multisite will make things simpler than installing multiple instances of standalone WordPress.
So how do you go about installing WordPress Multisite?
Activating WordPress Multisite
To activate WordPress Multisite, you’ll need an existing WordPress installation. This could be a brand new one, or one you’ve already been using — it doesn’t matter.
To start, open up the wp-config.php file in your site’s top level folder. You can access this via File Manager in your control panel, or by using a code editor with FTP access to your site.
In your wp-config.php file, find this line:
/* That's all, stop editing! Happy blogging. */
Immediately above it, add this line of code:
define( 'WP_ALLOW_MULTISITE', true );
Now save your file.
Go to your site admin in your browser. Then go to the Network Setup screen that will have been created for you (via Tools > Network Setup).
You’ll see a screen which asks how you want your network to be set up, using subdomains or subdirectories.
Using subdomains means each site will have a URL like https://site1.yournetwork.com. This is best if you want to allow other people to create sites on your network. If you do allow users to create site, you’ll need to set up wildcard subdomains in your control panel.
If you choose subdirectories, each site will have a URL like https://yournetwork.com/site1. If your site has been running for more than a month, you won’t have this option: you’ll have to use subdomains. This is to ensure there aren’t any clashes between the URL of any new sites you create on your network and any existing content you’ve got on your site.
If you’re given the option, select which one you want to use. Enter the title and admin email address of your network in the relevant fields and click the Install button.
You’ll be taken to the Network Setup screen. This screen will contain some code that you need to copy and paste into two files: the wp-config.php file, and the .htaccess file.

Open the two files in your code editor or using File Manager in your control panel. Paste in the code from this screen, making sure you overwrite anything it tells you to. Note that your code will be different from the code in the screenshot above, as your site is different from mine. Copy exactly what you’re given.
Note: It’s a good idea to make a backup of the files before you do this, just in case!
Now save and close those two files. Go back to your site admin and click the link in the Network Setup screen to log in to your network. Use the same login credentials you’ve always used.
You’ll now find that your admin screens have changed a little. You’ll have a new item in the toolbar at the top called My Sites, and another called Network Admin.
Hover your mouse over the My Sites link, and you’ll see a new menu which takes you to the network admin screens. Click the Dashboard link to be taken to the network dashboard:

This dashboard looks very similar to the dashboard for a standard WordPress site. There won’t be any blog posts, Quick Edit, or anything relating to content on display — because the network doesn’t have any content. That’s all stored in the individual sites.
You’ll also notice that the admin menu on the left is different. You’ll have a new item called Sites, which gives you access to site creation and management.
Let’s start by creating a site and configuring it.
Creating and configuring a site
There are two ways to create a new site on WordPress Multisite: from the network admin screens and from the front-end of the site. Let’s start by creating a new site via the network admin screens.
From the network admin dashboard, click the Sites link in the left hand menu. This will display a list of the sites in your network. You can see the sites I’ve already created in my network below, but when you’ve just activated Multisite, this screen will just show one site: the base site.
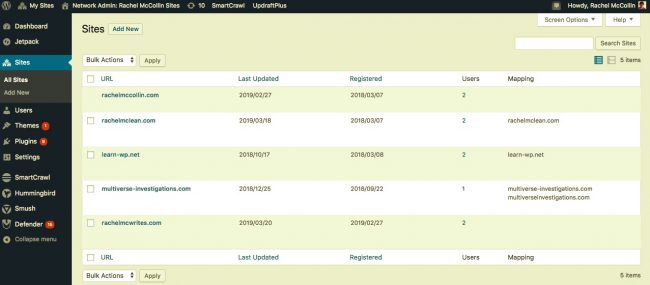
To create a new site, click the Add New button. This will take you to the Add New Site screen:
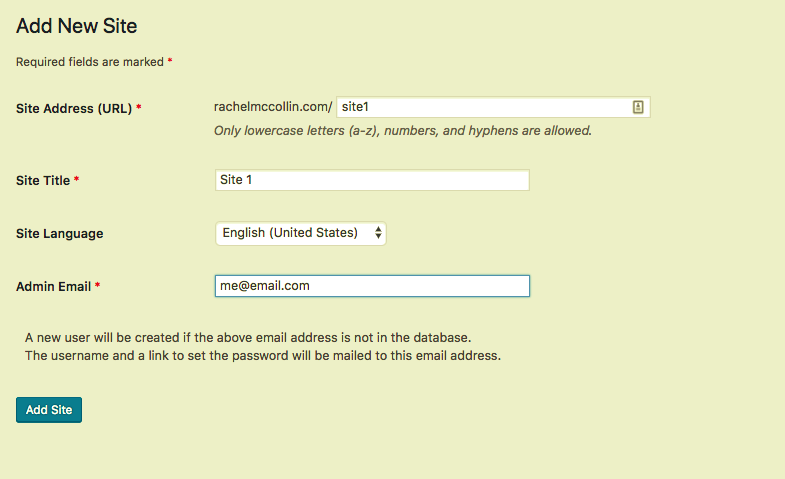
Fill in the fields with the details of the new site and hit the Add Site button. When you go back to the Sites screen, your new site will be displayed. If you hover your mouse over its name, you’ll have a few links:
- Edit: to edit the settings for the site (not the site’s content).
- Dashboard: to visit the site dashboard, from where you can add new posts and pages and get the site configured.
- Deactivate: to deactivate the site so no one can visit it.
- Archive: to make the site inaccessible to visitors and site admins but don’t delete it.
- Spam: to mark as spam, so that the user who created that site can’t create any more.
- Delete: to delete the site and all its data.
- Visit: to visit the front-end of the site.
The most useful option at this stage is Edit. Click on that to see the site editing screens.
Here’s an example from an existing site on my network:
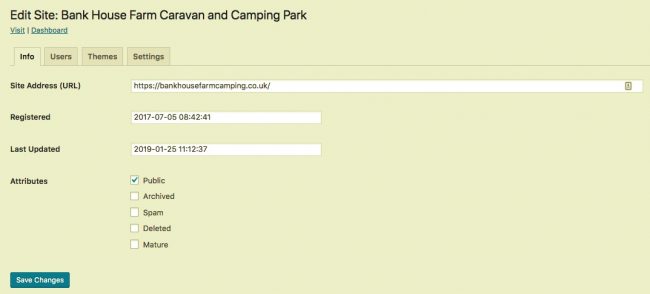
From this screen you can change the main settings for the site, such as its domain name and title. If you’ve got a dedicated domain name for that site and it’s pointing at your network, then you can add it here and the site will look to visitors like it’s a standalone site on that domain name — they’ll never see the network’s domain name.
You can also access the Themes screen where you can specify which themes will be enabled for this site. Depending on the way your network works, you might want to just enable one theme for each site, or you might want to enable all themes for all sites. I use a network for client sites, so I just enable the theme I’ve developed for the relevant site in each case. But if you were running a network like wordpress.com, where users can sign up and create their own site, you might want to network-enable all of the themes.
We’ll take a closer look at how you manage themes and plugins in your network in a bit, as it’s different from a standard WordPress site.
I mentioned above that people can also create a site from the front-end of your main site, They do this by going to the signup page at yournetwork.com/wp-signup.php, where yournetwork.com is the domain name of your main site (the one you started with).
This displays a screen allowing someone to either log in with an existing user account and create a site, or to create both a site and a user account at the same time:
If you don’t want to enable this, and just want to create sites yourself via the admin screens, you can disable signups. Just go to Network Admin > Network Settings and select the Registration is disabled radio button.
Managing themes and plugins
The way you manage themes and plugins is different in a Multisite network than in a normal WordPress site.
The main difference is that site admins can’t install or update themes or plugins. This is an important security feature, as you don’t want your users installing code that might make your network vulnerable.
To install plugins, go to Network Admin > Plugins > Add New and install the plugin in the normal way. For themes, go to Network Admin > Themes > Add New.
Themes need to be enabled across the whole network or for individual sites, and then activated by the site admin for each site. Plugins can be network activated or activated on a per-site basis by the site admins. Some plugins, such as security and backup plugins, are designed to work with the entire network, so you’d want to activate them for all sites. Others, such as social media plugins or ecommerce plugins, will only be relevant to individual sites.
Once you’ve installed a plugin, it’s available for all site admins to activate on their site. If you network-activate a plugin, they can’t switch it off.
Updating themes and plugins is also done by the network admin. As any updates will potentially affect multiple sites on your network, I recommend testing on a development installation of your network first, either on your local machine or on a staging server.
WordPress Multisite is an invaluable tool
I’m a big fan of WordPress Multisite. I use it to host my own sites as well as client sites, and it saves me a lot of time and effort keeping sites up to date. When I need to run updates, I only need to do so once on the network instead of doing it on every single site.
And if you want to make money with WordPress, a Multisite network that lets people create their own site by paying a subscription is a great business model.
Activating Multisite isn’t as complicated as you might think: if you run more than one site, why not try using Multisite today?