
Welcome to Part Three of our complete guide to building a successful hosting business using our award-winning Reseller hosting.
In this post you’ll learn how to brand and market yourself. We’ll explain everything from how to customise the eXtend Control Panel and the Domain Control Panel to make it your own, to how to make a custom default landing page.
Make sure to also check out part One and Two where we covered:
- How the Reseller Control Centre and the eXtend Control panel work
- How to sell domain names, hosting packages and email services
Let’s get started.
Customising the eXtend Control Panel
The eXtend Control Panel is where your customers will most likely spend most of their time. It’s where they can upload files, install a programme, or check their email.
Since it’s their main point of contact with your business, it’s important that you use branding elements to make it clear that this is part of your web hosting just as much as your website is.
Changing the details
Make your brand name and contact information visible. This not only helps to reinforce your brand name and but also customers’ trust since you’re letting them know that they can quickly and easily get in touch with you whenever they need to.
Adding your name
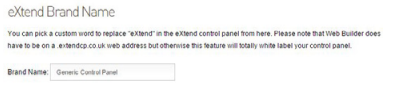
Your customers’ control panel says “eXtend” at the top by default. You have the option to change it and add your own business name, or whatever other name you want for your control panel.

To change the name of the control panel:
- Click ‘Configure eXtend’ under ‘Reseller Preferences’
- Under ‘eXtend Brand Name’, enter your new name in the text field next to ‘Brand Name’ 3. Click ‘Update Now’
- The name will now appear at the top of your customers’ control panel
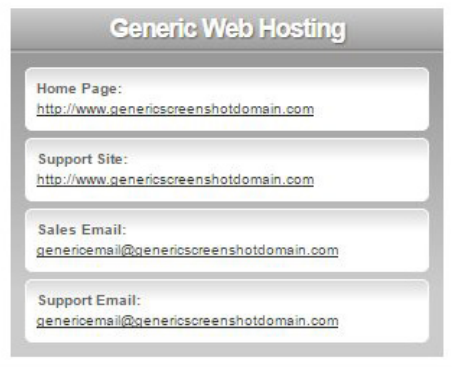
Adding your details
At the bottom of the right menu in your customers’ control panel you’ll see a panel with your hosting business details. This includes links to your website and support site as well as contact email addresses.
Make sure to fill in these links and information, otherwise this panel won’t be displayed in your customers’ eXtend Control Panel.
Don’t skip this step as it gives customers a quick and easy way to access your website and to get in touch with you.
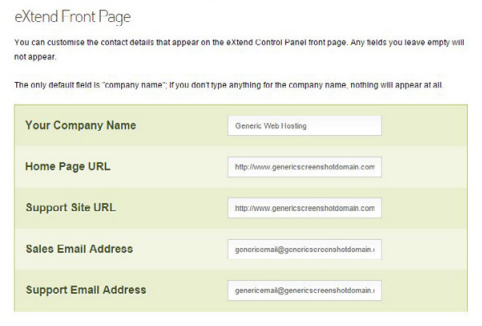
To add your details:
- Click ‘Configure eXtend’ under ‘Reseller Preferences’
- Scroll to ‘eXtend Front Page’
- Enter in your company’s name
- Enter in your URL
- Enter in your support URL
- Enter in a sales email address
- Enter in a support email address
- Click ‘Update Now’
- The details will now appear on your customers’ control panel
Changing the address
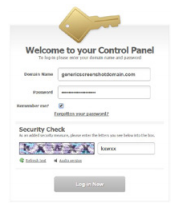
This the default address that customers can use to access their eXtend Control Panel: http://extendcp.co.uk. Once there, all they need to do to log in is to enter their domain name, password and the CAPTCHA security text.
You can change this address if you like. For example, if you want customers to access their control panel via your website, you can point the eXtend Control panel to a subdomain on your site.
If you want them to access it via their own websites, you can simply point the eXtend Control Panel to subdomains on their sites.
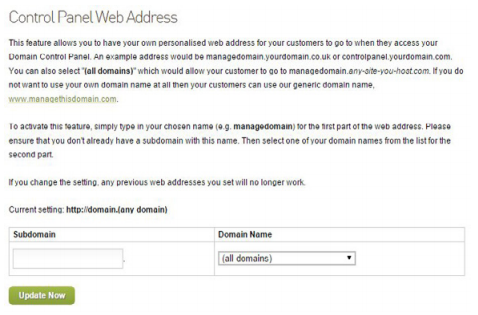
Here is the Control Panel Web Address, which you can configure it as you see fit.
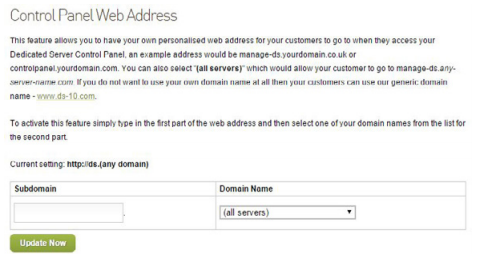
To set the Control Panel Web Address:
- Click ‘Configure eXtend’ under ‘Reseller Preferences’
- Enter in the subdomain you wish to use
- Select the domain name you wish to use from the drop-down menu
- Click ‘Update Now’
- Allow a minimum of 24 hours for the new subdomain to work
Adding Google Translate
If you’re selling hosting internationally, you can provide customers with a control panel in their own language.
While we’re not able to provide multilingual control panels at this time, due to the nature of shared hosting, we can offer the option to add Google Translate to their control panel. This will help translate most of the content on the page in many languages.
To add Google Translate to your Control Panel:
- Click ‘Configure eXtend’ under ‘Reseller Preferences’
- Check the box next to ‘Google Translate enabled’
- Click ‘Update Now’
- The Google Translate button will appear
![]()
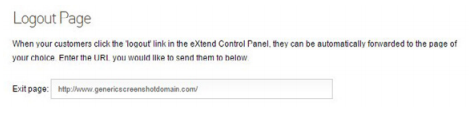
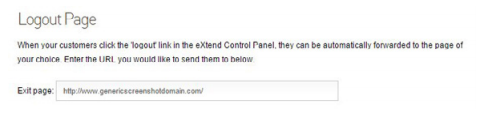
Forwarding customers to a logout page
When a customer logs out of their control panel, they’re automatically sent back to the initial login page. This is the default address.
However, you have the option to change it and set a different logout page that you want them to see the moment they log out.
It’s up to you decide which page you want to set as the logout page. It can be anything from your website’s homepage to a special offer landing page or a new product page that you’d like to promote and entice customers to buy.
To add a logout page:
- Click ‘Configure eXtend’ under ‘Reseller Preferences’
- Under ‘Logout Page’, enter in the URL you want customers to go to in the text field next to ‘Exit page’
- Click ‘Update Now’
- The customers will now be sent to that page when they log out
Creating a custom login page
While we’ve designed the eXtend Control Panel login page to be as clean and intuitive as possible, you have the option to create and use your own.
Since cross-site requests are permitted for our login page, this means you can create a login page on your own site that automatically directs your customers to their control panels.
Now, because our login process includes a CAPTCHA, you’ll have to include it on your login page as well. All you need to do is to copy and paste it from our code.
Keep in mind that creating and using your own login page only works if you don’t set eXtend as a subdomain on each website (such as control.genericscreenshotdomain.com). In this case you’ll need to look into how you can use our API to request a pre-authenticated login URL, which allows your customers to use their control panel directly from the login on your site.
To create a custom login page:
- Create an HTML page for your site
- Include a form in your page
- Have the form post to:
- http://www.extendcp.co.uk/login.cgi
- Include an input field with the name ‘username’
- Include an input field with the name ‘password’
- Include the code for the CAPTCHA:
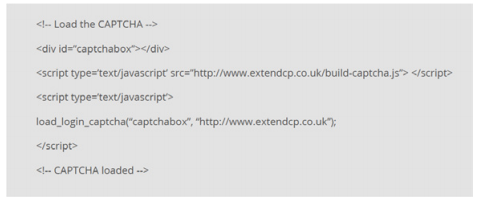
- Upload your page onto your site
- Your customers will now be able to log in
Changing the theme
The eXtend Control Panel provides your customers with everything they need to manage their websites. You have the option to change the look of the control panel to have it match your site and branding.
Selecting a theme
You can choose between three main themes for the eXtend Control Panel: Simple, Modern, and Advanced.
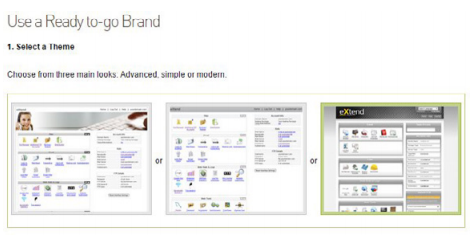
To choose a theme:
- Click ‘eXtend Themes’ under ‘Reseller Preferences’
- Choose one of the three themes
- Click ‘Apply Brand’
- Your control panel will now be in that theme
Selecting a banner
You can also select one of the many banners we’ve created. There are lots of options available so you can use whichever you believe best fits your brand and website.
If you go to the ‘This is Your Preview’ section, you can see how each theme and banner look so you can decide which ones work best for you and your customers.
One thing to keep in mind is that with the Simple and Modern themes, the name of your control panel will be displayed on top of the banner image you choose. In this case, we’d recommend you go with a simple banner image to ensure the text is easy to read.
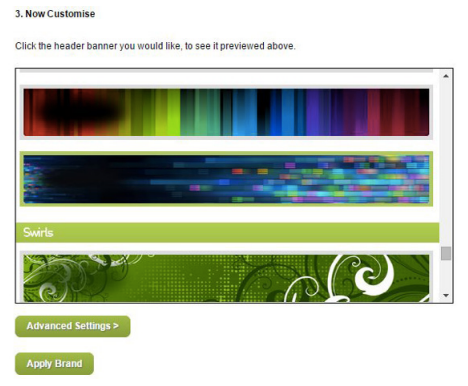
To select a banner:
- Click ‘eXtend Themes’ under ‘Reseller Preferences’
- Choose your theme under ‘Select a Theme’
- Choose your banner under ‘Now Customise’
- Click ‘Apply Brand’
- Your banner will now be used
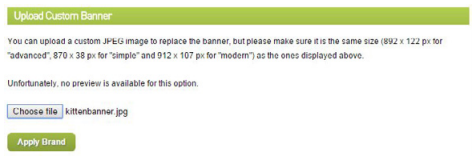
Uploading your own banner
If you find that none of the banners available work for you, you can also create and upload your own banner. Just make sure that it’s in a .JPG format and also that it’s not too large in size.
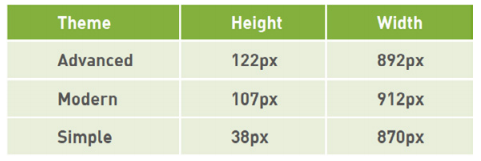
Since each theme comes with a different dimension for the top banner, you need to make sure that your custom banner is the same size.
Here are the banner dimensions for each theme:
To upload your own banner:
- Create your banner in your image editor and save it
- Click ‘eXtend Themes’ under ‘Reseller Preferences’
- Choose your theme under ‘Select a Theme’
- Click ‘Advanced Settings >’
- Under ‘Upload Custom Banner’, click ‘Choose File’
- Select your banner image
- Click ‘Apply Brand’
- Your banner image will now be on the control panel
Editing the HTML and CSS
If you want to further customise the look and feel of the control panel, you can also edit some of the HTML and all of the CSS to create a unique site.
To do that, you can download a simple HTML and CSS file from the eXtend Themes page to use as a guide. There’s also the option to select a default theme, click ‘Customise Ready to-go brand’ and then edit the HTML or CSS code.
To edit the HTML or CSS:
- Click ‘eXtend Themes’ under ‘Reseller Preferences’
- Click ‘Advanced Settings >’
- In the box under ‘Upload HTML Template and Preview’, paste in any HTML changes you have made
- In the box under ‘Upload CSS File and Preview’, paste in any CSS changes you have made
- Click ‘Apply Brand’
- The changes will be applied
If you make changes to the HTML code, make sure to keep the [BODY] element in the middle of the page because this is where the main part of the control panel will go. Also, keep in mind you can’t add tags since the server will add those in.
If you need more help, at the bottom of the page you’ll find a frequently asked questions section with more information and advice on how to customise your control panel.
You can always revert to the default control panel. To do that, simply select a new theme at the top, then click ‘Apply Brand’. This will automatically change your control panel to the basic version.
Customising the Domain Control Panel
The Domain Control Panel is where your customers can make changes to their domain names. They can edit their contact information, the features for their domain name, their DNS records, and more.
You can also change some elements to the Domain Control Panel to have it match your brand, just not as many as with the eXtend Control Panel.
Adding your details
You can display your contact information in the Domain Control Panel just like in the eXtend Control Panel. If you leave this section blank, your information won’t appear in the control panel.
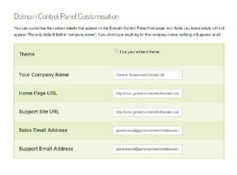
To add your details:
- Click ‘Domain Control Panel’ under ‘Manage Domain Names’
- Scroll to ‘Domain Control Panel Customisation’
- Enter in your company’s name
- Enter in your URL
- Enter in your support URL
- Enter in a sales email address
- Enter in a support email address
- Click ‘Update Now’
- The details will now appear on your customers’ control panel
Changing the address
The default address that your customers can use to access their Domain Name Control Panel is: http://managethisdomain.com. Once there, all they need to do to log in is to enter their domain name, password and the CAPTCHA security text.
If you want customers to access their control panel via your website, you have the option to point the Domain Name Control Panel to a subdomain on your site.
If you want customers to access the control panel via their own site, you also have the option to point the Domain Name Control Panel to subdomains on their sites.
This is the Control Panel Web Address, and you can configure it as you like:
To set the Control Panel Web Address:
- Click ‘Domain Control Panel’ under ‘Manage Domain Names’
- Scroll to ‘Control Panel Web Address’
- Enter in the subdomain you wish to use
- Select the domain name you wish to use from the drop-down menu
- Click ‘Update Now’
- Give at least 24 hours for the new subdomain to work
Creating a logout page
You have the freedom to choose which page your customers see the moment they log out of their control panels.
If you leave it blank, they’ll be directed to the initial login page. However, you can set the logout page to any page you like, from your site’s homepage to a special offer landing page.
To add a logout page:
- Click ‘Domain Control Panel’ under ‘Manage Domain Names’
- Under ‘Logout Page’, enter in the URL you want customers to go to in the
text field next to ‘Exit page’
- Click ‘Update Now’
- The customers will now be sent to that page when they log out
Changing the theme to match the eXtend Control Panel
To ensure consistency across your website and systems, you can have your Domain Name Control Panel match your eXtend Control Panel.
To change the theme:
- Click ‘Domain Control Panel’ under ‘Manage Domain Names’
- Scroll to ‘Domain Control Panel Customisation’
- Check the box next to ‘Use your eXtend theme’
- Click ‘Update Now’
- The Domain Name Control Panel will now use the same theme
Customising Webmail
While some of your customers will prefer to download their email onto their devices, others may choose to use the Webmail system.
You have the option to customise the login page for when customers visit their Webmail page, whether they do it through the eXtend Control Panel or through a domain or subdomain of your choosing.
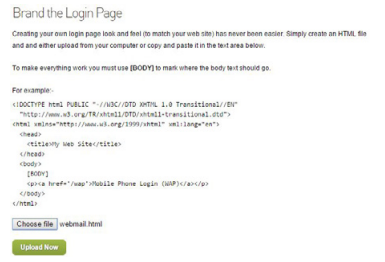
Branding the login page
Within the Reseller Control Centre, you can customise the Webmail login page to match your site and branding. This custom page will only show up if you activate a new address for the webmail or if your customers log out of Webmail from the eXtend Control Panel.
If you choose to create your own login page, make sure to keep the [BODY] tag in the middle as this is how the login page will bring in the form for your customers to use to log in.
You can either create a full HTML file and upload it to the Reseller Control Centre, or you can paste the HTML code in.
To create a login page:
- Click ‘Configure Webmail’ under ‘Reseller Preferences’
- Design your own login page in a text file, making certain to include [BODY] in the centre
- To upload a saved HTML file:
- Click ‘Choose File’
- Select your file
- Click ‘Upload Now’
- To paste in the HTML:
- Copy the HTML from your file
- Paste into the text box under ‘Paste HTML’
- Click ‘Update Now’
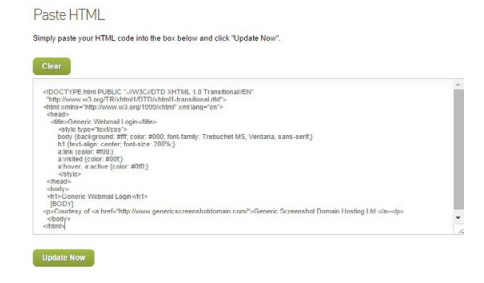
- The login page will be created
Changing the address
The default address for your customers to access their webmail is: http://www.outitgoes.com.
You can change this, too. If you want customers to access their email via your own website, you can simply point Webmail to a subdomain on your site. If you want them to access their email via their own sites, you can point the Webmail to subdomains on their sites.
This is Personalised Webmail, and you can configure it as you see fit.
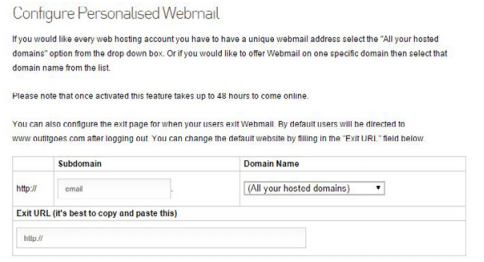
To set Personalised Webmail:
- Click ‘Configure Webmail’ under ‘Reseller Preferences’
- Scroll to ‘Configure Personalised Email’
- Enter in the subdomain you wish to use
- Select the domain name you wish to use from the drop-down menu
- Click ‘Update Now’
- Allow a minimum of 24 hours for the new subdomain to work
Creating a logout page
You have the freedom to choose which page your customers see the moment they log out of their email.
If you leave it blank, they’ll be directed to the initial login page. However, you can set the logout page to any page you like, from your site’s homepage to a special offer landing page.
To add a logout page:
- Click ‘Configure Webmail’ under ‘Reseller Preferences’
- Under ‘Configure Personalised Webmail’, enter in the URL you want customers to go to in the text field under ‘Exit URL’
- Click ‘Update Now’
- The customers will now go to that page when they log out
Creating a System Status Page
Heart Internet provides you with a white-label system status website where you and your customers can check to see if there are any issues with our servers or networks connection. You can access it at http://www.webhostingstatus.com/.
If you wish to create your own system status page, to host it on your website or to create your own system status website, you can do that too.
Each Reseller has a unique System Status Key that identifies you in the system as a Reseller.
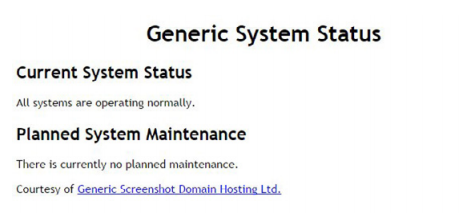
To create a System Status page:
- Click ‘System Status Page’ under ‘Reseller Preferences’
- Copy the PHP code in the middle of the page under ‘Set up Instructions’
- Create a PHP page with that code in the appropriate location
- Upload the PHP page to your site or domain
- You have now created a System Status page
Keep in mind that this must be on a Linux shared hosting account within your Reseller account.
Making a Custom Default Landing Page
When a customer buys a new domain name or a new hosting account from you, a white-label page is put up.
You can customise this page so that your company is still recognised as the owner of that account or domain name in case the customer doesn’t immediately build their website or points the domain to an existing site.
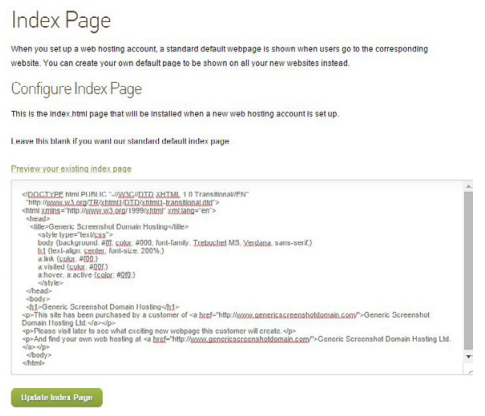
Creating a page for new hosting accounts
When a customer buys a new hosting package, a default page is put up until they add their own index page.
To create a custom default index page:
- Click ‘Default Index Page’ under ‘Reseller Preferences’
- Write an HTML text file with the information you want the page to hold
- Copy that HTML text
- Paste into the text box under ‘Configure Index Page’
- Click ‘Update Index Page’
- The page is now created
Creating a page for new domain names
You also have the option to create a default holding page for domain names. This page will be displayed until the customer points the domain at a site or until they purchase a hosting package.
Creating a default domain name holding page is different from creating a default hosting holding page. With the domain name holding page, you’ll need to create and upload an HTML page to an account before you can use it.
The domain will not redirect to the website with the page but, instead, the domain will point at the page.
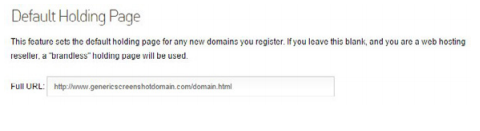
To create a custom default domain page:
- Click ‘Domain Control Panel’ under ‘Manage Domain Names’
- Create an HTML page with the information you want on the default domain page Upload the HTML page to your site
- Copy the full URL of your HTML page
- Paste into the text box next to ‘Full URL’ under ‘Default Holding Page’
- Click ‘Update Now’
- Your default domain page will now be used
That’s it for now. Hopefully, you now have all the information you need to edit and customise the key parts of your hosting business that your customers interact with the most: the eXtend Control Panel, the Domain Control Panel, and Webmail.
Have any questions or concerns? Feel free to share them in the comments below.