
Welcome to Part Two of our complete guide to building a successful hosting business using our award-winning Reseller hosting.
While in Part One we explained how the Reseller Control Centre and the eXtend Control panel work, in this second part we’ll walk you through all the steps to follow to sell domain names, hosting packages and email services to your customers.
Let’s get started.
Selling Hosting Packages
Shared Hosting Packages are the main product available within your Reseller Pro account.
As a Heart Internet reseller, you have the freedom to set the amount of space, bandwidth, subdomains, FTP accounts, MySQL databases, mailboxes, and more, as well as choose which operating system your customers can use and what features will be available to them.
You can create as many or as few packages as you want. This means that you can either offer your customers a single hosting package for fast and easy management, or a bigger and more diverse portfolio of hosting packages to choose from.
All your hosting options will be on a shared sever with sites from other hosts.
This means that your customers can enjoy fast and convenient web hosting where they don’t need to worry about software and security updates since everything is taken care of on the back end. The only thing they need to take care of is the front end of development.
Creating hosting packages
Creating and customising a hosting package is easy. You can choose to limit the amount of bandwidth that customers can use or the applications they can install. You can also choose to give them full access to bandwidth and applications. It’s up to you to decide how you want to create and customise the hosting package that best suits their needs.
To create a package:
- Click ‘Configure Hosting Package Types’
- Click ‘Web Hosting Package Creation Wizard’
- Select the web server type
- Give the package a name
- Select the amount you want your customers to have of the following items: Web space, bandwidth, subdomains, additional FTP accounts, MySQL databases, email forwarding accounts, email autoresponding accounts, mailing lists, and mailboxes
- Select the automated Welcome Email customers will receive when they are attached to the package
- Select the automated Password Reset Email customers will receive when they reset the password
- Check the box if you want customers have access to the Support Database
- Check the box if you want customers to maintain their domain names with their eXtend Control Panel
- Check the box if you have purchased Snapshot Backups and want to enable them
- Click ‘Next’
- Check the boxes for the web tools you want your customers to have with this package
- Click ‘Next’
- Check the boxes for the web apps you want your customers to be able to install
- Select the app you would like to have installed automatically from the drop-down list
- Click ‘Create Package’
- The package is now created and available for use
Attaching hosting packages to domain names
Once you’ve created a hosting package, the next step is to attach it to a specific domain name to create a hosting account. Since each hosting account uses a particular domain name as the identifier, your customers will be able to log into their eXtend Control Panel and Domain Control Panel using their domain name as their login.
Keep in mind that you can only assign one hosting package per domain name. However, you can assign as many add-ons as you want, and you can also edit and change the hosting package whenever you need to.
To add a package to a domain:
- Click ‘Add Hosting Accounts’
- Select the domain name from the drop-down list
- Select the operating system
- Select the package from the drop-down list
- Click ‘Activate Hosting’
- The account is now attached
Once the account is attached to a domain name, you can let the customer know that their new package is ready to use. You can do that by entering their email address or by assigning a customer from the Customer Database. Finally, click ‘Complete Setup’ to confirm.
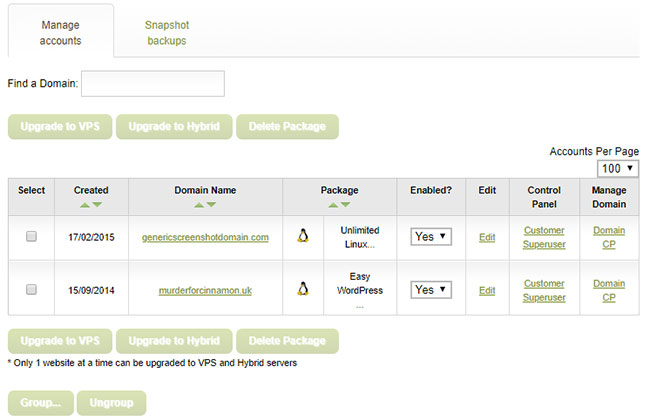
The Manage Hosting Accounts page
If you go to the Manage Hosting Account page, you can see the hosting packages you currently have, organised by domain name. It’s also where you can access the eXtend Control Panel or the Domain Control Panel for each package. This allows you to edit the features offered for each package, delete or disable the package, group packages together, or upgrade the package to a VPS.
Editing hosting packages
You can also edit a package to create a bespoke package for a customer, or change all packages to add new features. You also have the option to move customers from one package to another while keeping all their data intact.
Another thing you can do is to sell extra features to your customers such as increased bandwidth, additional mailboxes, more web space, or the ability to install certain software.
Editing all instances of a hosting package
If you wish to change the features of all your hosting packages, follow the steps below to edit them across all the current active accounts.
To edit all instances of a hosting package:
- Click ‘Configure Hosting Packages’
- Select the package you want to edit
- Check the box next to ‘Synchronise accounts’
- Make your changes to ‘Package Features’
- Click ‘Next’
- Make your changes to ‘Web Tools’
- Click ‘Next’
- Make your changes to ‘Web Apps’
- Click ‘Edit Package’
- The package is now edited
If you want all existing accounts to have the changes you’ve added, then you need to check the “Synchronise accounts” box. If you don’t check this box, then only future accounts will have the changes you’ve just made.
Editing a single hosting package
If a customer asks you for a particular feature, or if you want to customise your packages to match the specific needs of your customers, you have the option to make changes that only apply to a specific account.
To edit a single hosting package:
- Click ‘Manage Hosting Accounts’
- Click the ‘Edit’ link for the package you want to edit
- Make your changes to ‘Package Features’
- Click ‘Next’
- Make your changes to ‘Web Tools’
- Click ‘Next’
- Make your changes to ‘Web Apps’
- Click ‘Edit Package’
- The package is now edited
To switch a hosting account to a new hosting package:
- Click ‘Manage Hosting Accounts’
- Click the ‘Edit’ link for the package you want to edit
- Next to ‘Package’, select the new Hosting Package from the drop-down list
- Click ‘Next’
- Click ‘Next’
- Click ‘Edit Package’
- You have now switched the account to the new package
Deactivating hosting packages
If you wish to take a customer’s site down but still give them the option to return to you, you can simply set their package to Inactive. In this case, the site is taken down and the customer loses access to their files.
To set a hosting package to inactive:
- Click ‘Manage Hosting Accounts’
- Select ‘No’ from the drop-down list under the ‘Enabled?’ column
- Click ‘Update Now’
- Confirm the disabling
- The account will be disabled
To reactivate a hosting package:
- Click ‘Manage Hosting Accounts’
- Select ‘Yes’ from the drop-down list under the ‘Enabled?’ column
- Click ‘Update Now’
- The account will be reactivated
Make sure to let your customers know that deactivated accounts are deleted after 50 days.
Removing hosting packages
In case one of your customers cancels their account, or if you want to remove a hosting package from the system, you can delete the hosting package and account, or only the hosting package.
Now, to remove a hosting package you’ll first need to remove all hosting accounts that are attached to it. You can either delete the hosting account, or switch it over to another package.
To remove a hosting account:
- Click ‘Manage Hosting Accounts’
- Check the box under the ‘Del?’ column for the package you want to delete
- Click ‘Update Now’
- Confirm the deletion
- The package will be removed
To remove a hosting package:
- Ensure all instances of the Hosting Package are removed
- Click ‘Configuring Hosting Packages’
- Click the name of the package you want to remove
- Check the box next to ‘Delete Package’
- Click ‘Next’
- Click ‘Next’
- Click ‘Edit Package’
- The package is now deleted
Grouping hosting packages
From “Manage Hosting Accounts”, you have the option to group your hosting accounts into specific groups. For example, you can group them by package, by customer, or by another indicator.
Having a group of hosting accounts can be useful as it allows you to set up a master FTP login or additional reseller logins, giving you and your staff more options when dividing up the work needed to support your customers.
To create a group:
- Click ‘Manage Hosting Accounts’
- Select the rows for the packages you wish to group
- Click ‘Group…’
- Select an existing group from the drop-down menu or create a new group
- by clicking ‘New’
- The group will now be created
Pricing and marketing hosting packages
How you price your hosting packages is up to you. Since the cost of every shared hosting package you create is already built into your standard Reseller Pro account, your cost will remain the same no matter how many packages you sell.
Don’t know how to price your hosting packages? Start by taking a closer look at other webhosts to see what their offering and pricing look like.
Researching the industry and your competitors is useful not only to get an idea on competitive pricing but also to help you determine what your Unique Selling Points might be. By looking at how other webhosts are pricing and marketing their offering, you can figure out what you can do to differentiate your business and attract more customers your way.
Make sure you also take into account how much time you’ll be spending on each account. Are you planning to create bespoke accounts for each customer? Will you offer design and development services as well as hosting? Are you planning to provide 24/7 support to your customers?
Take all these factors into account when deciding on how to best price and market your hosting packages.
Selling domain names
You can sell hosting, servers, and add-ons to your customers, but without a domain name to point them to, other people cannot see them.
That’s why we’d recommend you to sell domain names as well, and also to entice your customers to transfer theirs to Heart Internet. With both domain names and hosting under the same company, you’re better equipped to provide steady service and adaptability.
Purchasing domain names
If you use HostPay or a third-party system that accesses the API, your customers can find and purchase domain names on their own. If you choose to use a different system, or to purchase domain names for your customers, then you’ll have to purchase them directly from Heart Internet.
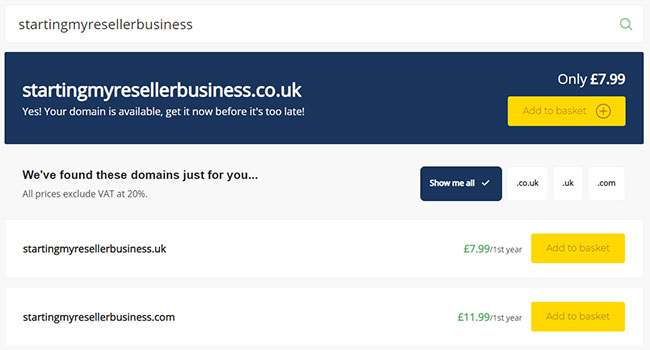
You can either purchase domain names from the Heart Internet website or use the Order Domains Name page in your Heart Internet Customer Area. If you use the Order Domain Names page, you have the options to order them individually, as a set, or to search for specific keywords to see which domains are available to register.
To purchase a single domain name:
- Log into your Heart Internet Customer Area
- Click ‘Order Domain Names’
- In ‘Single Domain Search’, enter the domain name you wish to search for
- Click the Magnifying Glass icon to search
- Select the domain name and extension you wish to purchase by checking the box under ‘Select’
- Choose the number of years you wish to purchase the domain name for from the drop-down list
- Click ‘Add To Basket’
- Complete the payment process
- You have now successfully purchased a domain name
Now, if you wish to buy the same domain name but with different extensions (such as .com, .co.uk or .uk), all you need to do is to select the extensions you want from the Domain Search page.
Using the Domain Robot
If you want to purchase domain names in bulk, or if you’re using HostPay or the API to enable customers to buy domain names, you’ll need to use the Domain Robot.
The Domain Robot is Heart Internet’s automated domain ordering system. To order domains, all you need to do is to send the Domain Robot a properly formatted email with the details of the domain names you want to purchase, and the Robot will purchase them for you and add them to your account.
To use the Domain Robot you’ll need Domain Credits, which allow you to quickly purchase domain names in bulk and save money.
You’ll need to have the appropriate credit for each domain name you purchase via the Domain Robot. For example, if you wish to buy a .com domain name for five years with domain privacy attached, you’ll need to have five .com Domain Credits and five Domain Privacy Credits.
To purchase Domain Credits:
- Log into your Heart Internet Customer Area
- Click ‘Order Bulk Domains’
- Select the Domain Credits you wish to purchase and click ‘Buy Now’ or ‘Buy With PayPal’
- Complete the checkout process
- You will now have the Domain Credits you need
Once you’ve purchased your Domain Credits, you can then send an email to the Domain Robot. Keep in mind that Domain Robot requires emails to be in a particular format and syntax. You can find the full list of keywords, and the syntax that must be used, on the Domain Robot page.
To send an email to the Domain Robot:
- Open up an email in your email program
- Make certain it is plain-text and has no subject line
- Enter in the keywords and details needed for your domain name, one on each line
- Send the email to [email protected]
- The domain names will now be registered
You can send in as many domain names as you want, all on the same line. Just be sure to separate them by a semicolon ( ; ) on the ‘domain:’ line.
If you’re buying the domains for yourself, there’s no need to include all the registrant information. All you need to provide are your customer email address, your Domain Robot password, the domains you wish to register, the number of years, and whether or not you want Domain Privacy.
Transferring domain names
If your customers have domain names with another company, find ways to entice them to transfer them to you.
One of the advantages of hosting domains with Heart Internet is that you can make renewals and attaching hosting packages and add-ons hassle-free. In addition, your customers will have access to the Domain Control Panel and the features available there. Domain names can be transferred manually or via the Domain Robot, and the process varies depending on the domain extension. For instance, .uk domain names go through Nominet, the UK’s internet registrar, which has a different process from other registrars.
The transfer process isn’t instant or the same for all domain names. Make sure to inform your customers of the time needed and the procedures they need to follow for their transfer to go through.
When transferring a domain name, you also have the option to change the Nameservers. This is where the hosting is located, and the domain name points to those servers to provide the website.
If a customer decides to keep their hosting with another company, leave the nameservers as they are. So, if you’re transferring the name manually, make sure to check the box next to ‘Leave nameservers unchanged’. If, however, you’re transferring it via the Domain Robot, then make sure to add ‘changenameservers:no’ on a separate line.
Attaching domains to hosting packages
Your customers’ domain names are connected to all their hosting and add-ons. This means that when setting up hosting, purchasing a server, upgrading their email account, or logging into their eXtend Control Panel, the primary domain name will be the main contact for products purchased within your Reseller Pro account.
To add a hosting package to a domain:
- Click ‘Add Hosting Accounts’
- Select the domain name from the drop-down list
- Select the operating system
- Select the package from the drop-down list
- Click ‘Activate Hosting’
- The hosting account is now created
Now you’re ready to inform the customer that they have hosting. You can do that by entering their email address or by assigning that customer from the Customer Database. Then simply click ‘Complete Setup’ to confirm.
Domain References
If a customer decides to keep their domain name hosted with another company, or if you’re in the process of transferring the domain and want to start building the website on our servers, you can create a Domain Reference.
The Domain Reference can only be found within the Reseller Pro hosting area. You’ll need to make sure that the domain name’s nameservers are changed to Heart Internet or that the name is transferred through. Keep in mind that it’s the only way to access your referenced website.
To set up a Domain Reference:
- Click ‘Domain References’ under ‘Manage Domain Names’
- Enter in the domain name under ‘Add a new Domain Reference’
- Click ‘Add Reference’
- The reference will be added
Domain Mappings
If a customer has several domain names and wishes to point them all at the same hosting account (for example, genericscreenshotdomain.com and genericscreenshotdomain.net), you have the option to map the additional domains to the account. This way visitors can see the same website whether they visit the .com or the .net.
This will only point domain names to the main public_html folder. We don’t support having multiple domain names on a hosting package that point to different directories.
To map a domain:
- Ensure both domain names are purchased or transferred into your Heart
- Internet Reseller account and that one has a hosting account assigned to it
- Click ‘Domain Mappings’ under ‘Manage Domain Names’
- Select the parked domain from the drop-down list under ‘Parked Domains’
- Select the primary domain from the drop-down list under ‘Map to’
- Click ‘Map Domain’
- The domain will now point to the primary domain
On the Domain Mappings page, you also have the option to edit your existing mappings, switching the primary domain or deleting the mapping.
Removing domain names
If a customer no longer wants a domain name, you can remove it from the hosting account and point it to another location. This can be a single holding page, your own website or another account. You can also set it so it doesn’t renew when its expiration date approaches. Make sure your customers understand that if they don’t renew their domain names, these can become available for other people to register or there could be additional fees for getting them back.
In other words, only set a domain name to not renew when you’ve made sure that customers don’t want it anymore.
Here are the steps to ensuring a domain name does not renew:
- Log into your Heart Internet Customer Area
- Click ‘Manage Domain Names’
- Select the domain name from the drop-down lists under Domain Parking or Web Hosting Domains
- Click ‘Manage Now’
- Click ‘Renewal’
- If the domain name is set to automatically renew, click ‘Change to cancel’
- The domain name will now no longer automatically renew
The Domain Control Panel
The moment you purchase a domain name, you automatically gain access to Heart Internet’s Domain Control Panel.
This is where you can change the nameservers, manage DNS, change the contact information, renew your domain name, or, if the domain is not attached to a hosting account, set up email forwarding, web forwarding, create a basic home page, or set the domain name for sale.
To access your customer’s Domain Control Panel:
- Click ‘Domain Control Panel’
- Click ‘Manage/View usernames and passwords now’ under ‘Control Panel Login’
- Scroll down to the domain name you wish to view
- Click on the domain name
- You will now be in the Domain Control Panel
Activating the Domain Control Panel
You have the option to give customers access to the Domain Control Panel so that they can make changes to their domain name, including transferring it to another company.
To activate the Domain Control Panel for your customers:
- Click ‘Domain Control Panel’
- Under ‘Enable/Disable Control Panel’, click the ‘here’ link
- The Domain Control Panel will be enabled
Your customers can access the Domain Control Panel via:
- Their eXtend Control Panel
- A domain or subdomain of your choosing (for example, dcp.genericscreenshotdomain.com)
- The white-label website: managethisdomain.com
Setting the features
Once you’ve enabled the Domain Control Panel for your customers, you can also choose to enable or disable features that they have access to. The features are:
- Domain Authentication Code – The code needed to transfer gTLDs
- Catch-All Email Forwarding – Forwarding all emails sent to this domain to a separate email address (available only if a hosting account is not attached)
- Change Contacts – Changing the Owner, Technical Contact, Administrative Contact, and Billing Contact for the domain name
- DNS Management – Changing the DNS records for the domain name
- Anti-Virus Filter Logs – The email anti-virus software’s logs of activity
- Email Forwarding – Forwarding emails sent to specific email addresses on this domain to another email address (available only if a hosting account is not attached)
- Domain For Sale Page – Set up a single page informing visitors that the domain name is for sale
- Home Page Creator – Set up a single home page for the domain name
- Change Nominet Tag – Changing the Nominet tag to transfer .uk domain names
- Domain Locking – Unlock the gTLD domain for transferring out
- Change Nameservers – Changing the nameservers to point to a host
- Opt Out of WHOIS – Setting up domain privacy for WHOIS
- Web Forwarding – Forwarding a domain name to a different URL
To enable or disable these features:
- Click ‘Domain Control Panel’
- Under ‘Features List’, check or uncheck all the boxes relating to the features you want to enable or disable
- Click ‘Update Now’
- Your customer’s Domain Control Panel will now have the features you want
Your Nominet preferences and Virtual Nameservers
When you set up a domain name, you can choose to use white-label Nominet details or nameservers. This way your customers won’t be able to see Heart Internet in their details.
Nominet IPS Tag
The Nominet IPS Tag can only be set to HEARTINTERNET or EXTEND. You’ll need to use these IPS Tags in order for the domain name to point to our servers.
To choose which IPS Tag to use:
- Click ‘Nominet Tag’
- Select the IPS Tag from the drop-down list
- Select whether or not you want all your .uk domains to be on this tag from the drop-down list
- Click ‘Update’
You also have the option to add your contact details, which will show up in the WHOIS results as well as in the emails sent to your domain customers.
Nameservers
When a customer points a domain name to your hosting account, the default nameservers are:
ns.mainnameserver.com
ns2.mainnameserver.com
While these are designed to be anonymous, you can also purchase Virtual Nameservers, which give you the option to use your own domain name as a nameserver. So, for example, with a Virtual Nameserver, you can have:
ns.genericscreenshotdomain.com
ns2.genericscreenshotdomain.com
To purchase Virtual Nameservers:
- Log into your Heart Internet Customer Area
- Click ‘Order Add-ons’
- Select ‘Virtual Name Servers’
- Select your payment option
- Click ‘Add to basket’
- Complete the checkout process
Once you have purchased the Virtual Nameservers, click ‘Virtual Name Servers’ under ‘Reseller Preferences’ to set them up and apply them to your sites.
Pricing and marketing domain names
As with hosting packages, it’s entirely up to you how you price and marketing your domain names. You can choose to sell the full range of extensions or to limit them to whichever extensions you want.
To see the full range of domain name extensions and prices:
- Log into your Heart Internet Customer Area
- Click ‘Renew Services’
- Click ‘View Heart Internet Renewals Price List’
Keep in mind that this doesn’t include any additional fees or VAT.
We highly recommend you to do some research and see how other webhosts are selling the domain names you wish to sell. This will help you figure out what prices to set for your domain names, as well as to see whether there are untapped markets in the domain name field that you can take advantage of to differentiate and grow your business.
Selling email services
You can add at least one email address to every hosting package you sell. While with our shared hosting, you can have an unlimited number of email addresses within each package, you can choose to limit the number for each hosting package you sell.
Your customer’s mailbox
When you set up a mailbox for a customer, you’re actually creating an email address where emails are stored on our server until that customer deletes them.
Access
Your customers can access their mailbox as follows: through webmail – using our domain www.outitgoes.com, a domain or subdomain of your choice, or their eXtend Control Panel – or download mail into a mail client on their device.
Junk Mail Filters
Your customers can turn on our built-in junk mail filter, which will immediately send spam messages to a specific spam folder or email address. Now, it’s possible that some genuine messages get labelled as spam, which is why we’d recommend that you check all spam folders on a regular basis.
Adding mailboxes to hosting packages
When you create a hosting package, you can add mailboxes as well as forwarding email accounts, autoresponding email accounts, and mailing lists. While you can give your customers unlimited mailboxes, we’d recommend a set limit. That’s because having too many active mailboxes can cause undue strain on the server.
To add a mailbox to a hosting package:
- Click ‘Configure Hosting Packages’
- Select the hosting package you wish to edit, or click on ‘Web Hosting Package Creation Wizard’ to create a new package
- In ‘Package Setup’, choose a number from the drop-down list under ‘Mailboxes’
- Click ‘Next’
- Click ‘Next’
- Click ‘Create Package’ or ‘Edit Package’
- You have now added mailboxes to the package
You can do the same with forwarders and autoresponders, as well as mailing lists.

Setting up hosting customers’ mailboxes
While your customers can set up their own mailboxes within their eXtend Control Panel, you have the option to set them up for them, if you want. You can do that by accessing their eXtend Control Panel and setting up the addresses.
To set up a mailbox:
- Click ‘Manage Hosting Accounts’ under ‘Manage Web Hosting’
- Click ‘Customer’ under the ‘Control Panel’ column for the hosting account you need to edit
- In the customer’s eXtend Control Panel, click ‘Mail Boxes’ under ‘Email’
- Under ‘Add a New Mail Box’, enter in the name of the mailbox
- Click ‘Add’
- The mailbox is now created
The password for the mailbox is automatically generated by the system. Your customers can change or reset their passwords through their eXtend Control Panel.
Keep in mind that a new mailbox can take up to an hour before it can send and receive emails.
To delete a mailbox:
- In the customer’s eXtend Control Panel, click ‘Mail Boxes’ under ‘Email’
- Under ‘Modify Mail Boxes’, check the box in the ‘Delete’ column for the mailbox you wish to remove
- Click ‘Modify’
- The mailbox will be removed
If the mailbox has emails in it, or if it continues to receive new messages after you’ve deleted it, you can easily redirect them to another address. Simply check the box next to ‘When deleting a mail box, please send leftover emails to’ and specify an email address where you’d like the emails sent.
You and your customers also have the option to set up spam/junk folders for each mailbox by clicking ‘Junk Mail Filters’ in their eXtend Control Panel.
Setting up domain customers’ mailboxes
If one of your customers has a domain name but not a hosting package with you, you have the option to set up an email for them.
Setting up a forwarding email
While they won’t have a mailbox by default, you can set up forwarding email for them from the Domain Control Panel. This is a free service for anyone who’s registered a domain with Heart Internet. However, it only works if the domain name’s nameservers have not been pointed to a different host.
To set up a forwarding email:
- Click ‘Domain Control Panel’ under ‘Manage Domain Names’
- Click ‘Manage/View usernames and passwords now’ under ‘Control Panel Login’
- Click the domain name you wish to access
- Click ‘Email Forwarding’ in the customer’s Domain Control Panel
- Enter in the name they would like to use
- Enter in the destination email address
- Click ‘Update Now’
The forwarding email can take up to an hour before it can forward emails.
Buying a mailbox
Heart Internet also has standalone mailboxes available for sale, including Microsoft Exchange.
That’s it for Part Two. Hopefully, you now have a better understanding of the products you can sell with your Reseller Pro account, as well as how to price and market domain names, hosting packages and email services to your customers.
Have any questions or concerns? Feel free to share them in the comments below.